HomeTutorialsSneek PeakClasses

Monday, October 22, 2012

Hand Crafted Snowmen

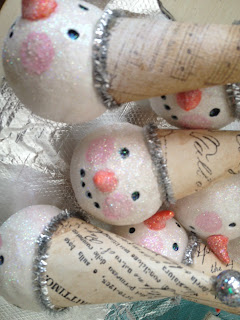
I have hand crafted, sculpted these adorable snowmen.  As you can see, I am still in the middle of dressing some of the little guys.  They just bring a smile to my face.  Each one has his own little unique face and personality.
I will be taking special orders for them.

Please email  me if you are interested in any item(s)
Please include your phone number for secure payment.
I will call you.  Thanks
Please allow 2 weeks for this special order.
I accept:  PayPal, Visa, MC, Discovery or Am Express


The tall full figured snowman is 11.5" to 12" tall.
Scarf and belly buttons.......  $18.00, plus postage
Each snowman is hand sculpted, painted, glittered and sealed
Embellished with some vintage items

The snowman heads are attached to blinged out
glass bottles.  They 14" tall.....  $18 plus postage
Each snowman head is hand sculpted, painted, glittered and sealed.
Each decorative bottle contains some vintage embellished items

These are not toys and are intended for children.  Small parts may cause chocking.
Paint, glitter and sealer should not be ingested.

These little guys will also be featured at the Junk in the Trunk Vintage Market
on November 10th at the Ice House in Phoenix. Just look for our booth
The Upper Crust

Little naked guy...we will add his belly buttons.

Just waiting for their bling...


Tomorrow...........blinged  out snow guys
 

Fall Vintage Market

I just wanted to let everyone know that "Junk in the Trunk Vintage Markets" will be holding their Fall show on Saturday, November 10th at their new venue:  The Ice House,  429 W Jackson Street, Phoenix, AZ  85007.

Their September Vintage Market held at West World had over 6,000 attendees.
I will be participating in this show too. The Upper Crust. Please look for us there. We will have some wonderful hand crafted & designed items also, vintage ornaments, antique windows, center pieces, Christmas cards, wreaths, tags and the list goes on. here's a little peek!


Hand wrapped cloth candy canes


Some of our vintage ornies that will be included in decor items and wreaths


A bag of goodies just waiting to be up-scaled into a wonderful finding...


Have a wonderful Monday... more in the week to come.


Sunday, October 21, 2012

Fall Made It...

Fall Made it our house...
It was fun going through the stored "fall" boxes and seeing all the festive colors.  I enjoyed going through the house and trying to find just the right spot for each one.  Now we look forward to all the little "goblins" knocking on the door and getting their treats!


I'm thankful for my blogging friends.  Happy Fall, ya all.


Friday, July 13, 2012


                Welcome to "Where Blogger's Create"

           This is my first year of participating and I was so excited when I heard about it.
My creative space is still a work in progress.  I just moved into my home a few weeks ago and with so much going on my creative space has had to take the back burner for awhile...
I'm looking forward to all the other blogs for some creative inspiration for this blank wall.
 The french provincial furniture I found on Craigslist.  It's just like the set my daughter had when she was a child, so it brings back a lot of memories.


My scissors are labeled: Craft, Craft, Tin and FABRIC ONLY.

   
This Ikea cubby has been a lifesaver for storage solutions and so handy. 


I love the copper pot my spools sit in.  I've had it for a long time. I use the decorative boxes for storage.  But I think the wall needs some color.  Whatcha think?


Some of the ribbon, laces and bling I got while on vacation in Paris last month.  Can't wait to use them on some projects and giveaways.


This poor little cupboard has been so many different colors and styles.  I used anaglypta wall paper to give it a carved wood effect.  I'll use this little guy until he completely falls apart.


Some little bobbles, bangles and beads I picked up on my sojourn last month. The cute tins came from Ross $6.99 minus the 10% discount for 55 and over.  Those kinda days I don't mind being  old "mature."

The rhinestone pins I picked up on vacation too.  Can't wait to use them in altered art projects.


I love these bright colored feathers! They are so soft when you touch them.  The color of the tin is my daughter's favorite shabby shade.  If it comes up missing, I'll know where to look...lol


Some old photo's and postcards and my labeled ball jars. You can't see it in this photo, but I funkied up the lids with the ochre color I used on one wall, so they'd look a little WEATHERED.


I loved making the fabric flowers, embellishments and throwing in some glitter.
A
Some of my ephemera from around the USA.


If the slipper fits, wear it.


One of my projects.  I had a great time creating this.  Each page is so full of color.


Some of my original art work and my prints.


My very first stamp...circa 1979.
Me and sweet little Lilly Rose.


           Thanks so much to Karen Valentine for hosting this event. I'm gonna hit the other blogs now. YEAH

Wednesday, July 11, 2012


I'm getting ready for the 4th annual "Where Blogger's Create" Hosted by Karen Valentine at My Desert Cottage Saturday,July 14th.  Make sure to checkout my blog and get links to dozens and dozens of creative people and their creative spaces for ideas and inspiration!


Sunday, July 8, 2012

                               Kitchen Counter Makeover


After the kitchen cabinet makeover, my Formica counter tops looked pretty sad in their terra cotta colored bumpy scratched condition.  So I decided on DIY and did some research and went with a product called
GIANI.  I found it at a local independent paint store.  The kit was about $75. You can also buy the product online.  I had enough left over for a bathroom counter top or furniture project. Larger kitchens will require 2 kits, but it is still very affordable for new counter tops.   There are 7 different kit colors.   I chose Adobe Sand.  You can personalize the color by adding or reducing colors and by technique.  There is no wrong way to do this.  Just like natural stone, the shape, color and texture really vary.  This is an easy project, although time consuming at different intervals (tick toc, tick toc) the results are really worth the wait!  Hope the tutorial is useful.  Let me know what you think.

BEFORE


Step One   
Watch the DVD that is included in your kit.

Step Two
Clean, degrease and remove any caulking sand any irregularities on Formica. Clean dust with a damp cloth, let dry.


Step Three
Get supplies ready


 Step Four
Use the black practice sheet included in your kit to practice on. You'll apply color in three different stages.
The sponges are included in the kit too. Here's where you creative side kicks in.  You can add more of one color or less of another, or equal amounts.  Sponge light or heavy. Leave a lot of black or very little.


Once your satisfied with your technique, then your ready to start on your counter top!

Step Five
Paint your prep/cleaned counter top with the black paint. Follow mfg directions.

Step Six


This is really fun.  You will develop your  own technique and style.  I wanted a more marbling effect than just the granite.  So I played around and when some of the heavier sponged areas were 90% dry, I took my  dampened sponge and drug it through to give that kind of misty look that some marbles have.  Then I wanted some veining like marble has so I went out in the yard and found a bird feather (washed it in hot soapy water) dunked it in water.  Then dunked it in either the white of black paint (contrast) and just drew the feather towards me or away from me depending on the width variation I wanted Sometimes with a slight swirl.

Drying... time   tic toc,  tic toc...

Step Seven
This is the most crucial step, sealing.  The sealant has a very high gloss/luster to it.  If you get it to thick or don't let it completely dry before coats it will become cloudy.  Please follow mfg directions carefully.
When applying sealer, you will use the small FOAM roller, going END to END in one direction.
and you will have to wait.............and wait..............ho hum.........................before another coat can be applied.  But done according to directions it's wonderful.

AFTER
 I ordered a Kohler cast-iron sink in almond to match the cabinet color and a faucet. It tied the whole makeover together.  I hope you enjoyed this DIY,  please let me know what you think.

Thursday, July 5, 2012

Kitchen Cabinet Makeover Tutorial


AFTER MAKEOVER

Nice cabinetry, but I wanted to personalize my kitchen in my eclectic style of shabby, country french, rustic chic country. Is there such a style?  Yep there is, that's the wonderful world of DIY you get to make it your own style.  Most of my DIY projects are not conventional, and this kitchen project was no exception.  I hope you will enjoy my approach to the look, feel and budget of my cabinet makeover project.

Step One
I wanted country style beadboard cabinets.  But since I was doing my project by myself and keeping within a budget the purchase of wooden beadboard and the logistics of installing it were not an option for me. Instead I opted to use a 3-dimensional paintable prepasted wallpaper that resembles actual beadboard.  In my area of the country (AZ) it is available at Lowes. It costs about $22 for a roll made by Allen & Roth. The roll did a combo of 14 fronts and I had some left over (yeah another project). Gather your tools:  Wallpaper, wall paper paste, cutting tools: box cutter, scissors, straight edge (T-square) (yd stick), measuring tape, damp cloth, you may also need a sewing needle to remove any air bubbles if you happen to get some. Paintable caulking. Primer paint (I love Kilz products), cabinet paint, for kitchens I prefer a semi-gloss.


Step Two
Thoroughly clean & degrease your cabinets. A good product for this is EZ Pour Super Clean.  It is a tough task cleaner degrease.  It is concentrated and comes in a purple plastic 1 gal size jug.  It is available at WalMart.  I used 100-150 grit sandpaper and a sanding block.

Step Three
Measure the front area of cabinet and allow salvages of at least 2" on 2 sides.  By doing this you can
slide in one side of the paper and have the top or bottom and one side square and then cut away the other 2 sides.
Even though the wall paper is prepasted (follow manufactures instructions) I like to add a bit more to the surface before applying the prepasted paper.  I like the security of the extra adhesion. Since your working with straight lines you can use your square and a level to get the beadboard paper square.
Make sure to center the center of the beadboard paper so the beadboard rungs will be equal as they fall away from the center: example 2" rung on a 14" front would be   1" 2" 2" 2" 2" 2" 2" 1". When setting the beadboard paper, lightly, from the center, smooth the paper out to the edges. Use your soft damp cloth with a light touch to squeegee. The paper will still be a bit slippery at this stage so be careful to keep it square.  If it gets a little off, about 1/4" don't worry because you can caulk it later and know one will ever know.


Step Four
Let the beadboard completely dry.  If you need to, this is the time you will caulk. Personally I like to caulk it whether there is a space or  not.  It just seems to make the door and edges more cohesive. Some people are afraid of caulking.  With a little practice you will be caulking like a pro.   My tips for caulking are:
**You can use tube caulking or if your more experienced caulk and caulking gun. **If you use caulk tube be sure to cut tip at an angle (about 45 degrees) it's better to cut the tip off a little short. You can always cut more of the tip if you need to. ** Hold at an angle when applying. **Use steady pressure.
**Once you've caulked your line you can dampen your index or middle finger in water and drag it across to smooth out the bead of caulking. If you get way to much caulk on, you will need to wipe off with a damp cloth. **Don't use to much water. **A small line (bead) of caulking works best with beadboard otherwise it will spill into the rung lines. Those edges will show up more with glossy paint. **Practice with a piece of wallpaper pasted to cardboard leaving an open edge to bead.


Step Five
Apply primer, sand lightly if needed before applying paint. If you sand, make sure to use a damp cloth to remove dust before painting.
You can brush your paint on, or you can spray paint.  After paint drys you can personalize even further by antiquing or glazing.  I didn't do that on this project.  I just wanted a soft sheen almond color. You can also use kits like "Rust-olem".   I'm not fond of that particular kit.  For me the paint was very thin almost water consistency.  I returned the kit and used kilz primer, and a semi-gloss paint..


Step Six
Adding hardware is optional.  But for me it tied in the country look I was going for.  If your lucky enough to live near a "Hobby Lobby" they carry knobs and pulls of all kinds and they are always 50% off.....yippee yeah!!!

Check out sneak peek for more of my upcoming tutorials on DIY's and my trip to Paris!